Developing a web application with Meteor and React - Part II
In the first post of the series, we create a basic application using Meteor, React and some nice packages. We can add messages to our chat room although we need to use the browser's console.
It is time to solve that and add messages to our chat room using a form.
Go to the directory where you have installed jaChat and check out step1.
git checkout step1
Our first React form
We are going to create a form that allow us to write a message and send it to the chat so everybody can see it. But first let's do some changes to our files. If you check the dashboard directory you will notice that now there are two files, one of them called index.html is a standard template and the other one called recent_messages.cjsx is a React file. Both template systems, React and Blaze can live together. You can even use both of them at the same time, look at the contents of index.html.
\<template name="dashboardIndex"\>\<h1\>Main Chat\</h1\> {{\> recentMessages }}\</template\>
It is a very basic Blaze template, we are displaying a header text in plain html and then calling another template called "recentMessages" which is in fact a React template.
Let's move to recent_messages.cjsx. The big difference with our last post is that now we have a fourth component called NewMessageForm.
Take a look at the render method, very simple html code there. A form with an input element and a submit button. Now when we press submit, the onSubmit method of the form will call "handleSubmit" which is a method we have created and that handle all the logic of the submit. Let's see what it doesline by line.
First we use preventDefault() to stop the submit event from propagating. Now we get the content of the description input and assign it to a variable called "description". We use"findDOMNode" that is a useful method to find elements inside the DOM. After thatif the value of description is empty we call return to finish the execution of the method as we don't want to add an empty message. In line #4 we insert the content of the message inside the Messages collection. We are using the same method that we use on the console the last time the only difference is that now we are calling that method inside a React component. And the last step is to empty the input element so the user can add new messages.
React Refs
React provide us with Refs so we can reliablyaccess any element that's being rendered in the DOM. As we saw in our last post React creates a virtual DOM with the page it wants to render. Then uses it to calculate the differences with the actual page and render that differences into the DOM. With Refs we can refer to any element that is outputted from render.
By adding a ref attribute to our input element we can reliably reference it later inside the "handleSubmit" method. You can even associate callbacks to refs elements. These callbacks will get executed after the element is mounted and the referenced element will be passed as a parameter to the callback function. Let's see an example:
InputText = React.createClass setFocusOnInput: (element) -\> React.findDOMNode(element).focus() render: -\> \<input type="text" className="form-control input-sm" ref={setFocusOnInput} placeholder="Type your message here..." /\>
When the InputText component is mounted the callback will be executed and the input element will get the focus.
We have seen now three important properties of React components: Props, States and Refs. Maybe it is a good time now to check the documentation and refresh the concepts about each of them.
Our chat application getssome design
If you take a look at the components that we already createin the last post you will notice that although the functionality is the same there are new html markup added to create a basic style to the application. There is a couple of changes worth mention.
In line #7 of recent_messages.cjsx we are sorting the messages by date. Now the user will see them in descending order and the most recent messages will be at the bottom of the page.
We are formatting the date when the message was created using MomentJs. Moment Js is a library for date/time manipulation and we have added it as a package. Take a look at line #40.
\<i className="fa fa-clock-o fa-fw"\> \</i\>{moment(@props.createdAt).fromNow()}
We are creating a new moment object and calling fromNow() which returns the date in relative time ( 3 minutes ago, 1 hour ago, etc...).
Some basic security
In order to make our application more secure we are going to remove a package that has been installed by default in our project. Open the terminal go to the directory where the project is located and write this:
meteor remove insecure
Insecure is a package that is very useful in the early stages of developing an application and that is why it is included by default when we create a new Meteor project. It basically allows us to perform insert, updateand deletefrom the browser without having to configure permissions.
Once we remove that package there is something we have to have in mind every time we want to manage our data: Our code is trusted or untrusted?
Trusted code is the code that runs on the serverwhile Untrusted code is the code that runs on the browser.
Now that the Insecure package is removed is time for us to test what happened. Open the application and try to insert a new message using the form.

We are trying to insert a message from our browser. Remember that the code that insert the message is located in client/templates/dashboard/recent_messages.cjsx and that is code that runs in the browsers therefore it's untrusted code.
There is one limitation that it's good for you to know. Untrusted code can only modify one single document using its "Id". You can not use the "multi" Mongodb selector on the client side nor you can perform upserts.
To be able to insert messages again we have two options, insert the message in the server where all code is trusted or give permission to the browser to insert messages. For now, let's take this last approach.
Allow and Deny
By using Allow/Deny on our collections, we can decide what operations that comefrom client code insert/update/remove can be executed. This will not only give us better security but will permit us to add business logic to those operations.
Open server/publications/messages.coffee
We are applying two simple rules. We are allowing inserts from the browser and we are denying removes. For now there is no other logic but if you look at the params you will notice that Meteor provide us the document we are trying to insert/remove and the Id of the user who is trying to do so. With this information, we can add some logic like, for instance, check that users can only remove their own documents.
Please have this behaviour in mind if you add multiple Allow/Deny callbacks to the same collection.
- If you only add Allow callbacks if only just one of them returns true, the operation will take place.
- If you only add Deny callbacks if only just one of them returns false, the operation will be cancelled.
- If you have a mix of Allow/Deny callbacks if only just one of the deny callbacks returns false the operation will be cancelled. If they return true then if only just one of the Allow callbacks returns true the operation will takeplace.
It is worth reading the documentation about Allow/Deny. You need to understand how it behaves to avoid
Anyone can visit our application write something on the input box and send it. What if someone writes some malicious code that may lead to an XSS attack?. Let's try doing that. Open the browser go to the application (http://localhost:3000) and write this in the input message:
\<script type="text/javascript"\>alert('Booom!');\</script\>
Luckily for us nothing bad happens. The message is displayed as text and not interpreted as a script.
[caption id="" align="alignnone" width="437.0"] 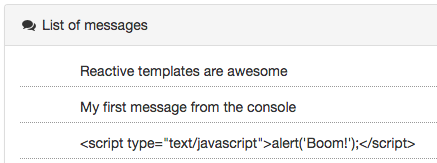 React sanitize the output. [/caption]
React does a good job, sanitizes the content of the message and displays it as plain text. Here we have one first level of protection against XSS attacks and it is active by default.
If you like living on the edge and want to allow HTML tags then React has the intentionally scaring prop of "dangerouslySetInnerHTML" which you can use to avoid sanitizing the text.
Summary
Our application has a functional chat. Visitors can post messages and thanks to the wonders of Meteor DDP and reactivity everybody else will be able to see them and have a conversation in real time. We have seen React Refs to gain access to elements in the DOM and now we have the notions of trusted and untrusted code. With Allow/Deny we can handle client side security and business logic. Finally, we have seen how react protect us againstXSS attacks.
The application still has very basic functionality, though. In the next post we will integrate user management and only registered users will be able to post content.
Image source:freenaturestock